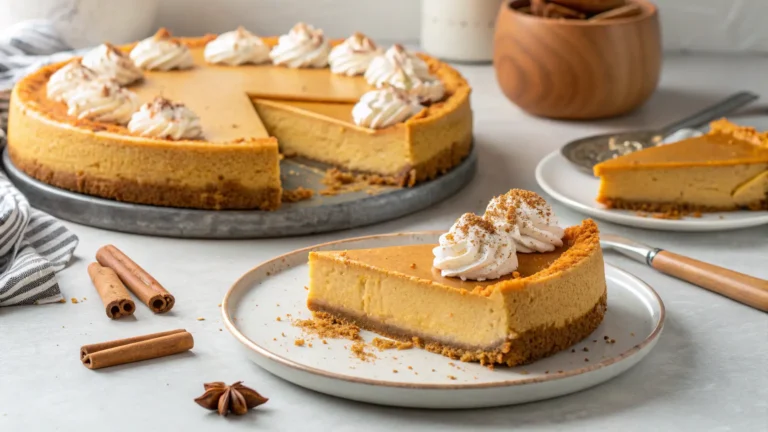

The Best Keto Pumpkin Cheesecake You’ll Ever Make (Seriously!)
Okay, so picture this: you’re craving that rich, creamy pumpkin dessert that screams fall vibes, but you’re trying to stick to keto. I know, I know – it sounds impossible, right? Well, plot twist: it’s totally doable, and I’m about to show you how!
This cheesecake is honestly a game-changer. Like, people won’t even believe it’s low-carb when they taste it. I’ve seen folks call it “restaurant quality,” and honestly? They’re not wrong. Whether you’re dealing with Thanksgiving, Christmas, Halloween, or just a random Tuesday when you need something amazing, this recipe’s got your back.
Why Go Keto with Your Cheesecake?
Look, life’s too short to skip dessert just because you’re watching carbs. This recipe basically lets you have your cake and eat it too (pun totally intended). You get all those cozy fall flavors without the sugar crash or the guilt trip afterward.
Here’s the thing – I’ve heard from so many people who say this was their first keto dessert, and it literally helped them stick to their weight loss goals. One person told me they ate it regularly and still lost weight! It’s like having a delicious little cheat code for staying on track during the holidays when tempting treats are everywhere.
Plus, you’re getting protein, healthy fats, and some fiber from the pumpkin. Win-win-win!
Let’s Talk Ingredients (This Part’s Important!)
Alright, here’s where we separate the pros from the rookies. Getting your ingredients right is basically half the battle.
Pumpkin Puree – Don’t Mess This Up!
Always, ALWAYS use pure pumpkin puree. Not the pumpkin pie filling stuff – that’s loaded with sugar and all kinds of additives that’ll totally wreck your keto game. Trust me on this one. If you’re feeling fancy, you can even roast your own pumpkin and make puree from scratch (though honestly, the canned stuff works perfectly fine).
Cream Cheese – Go Full-Fat or Go Home
Full-fat cream cheese is usually your best bet for that rich, indulgent taste we’re after. But hey, if you want to lighten things up a bit, low-fat cream cheese (the Neufchâtel kind) actually works pretty well too. Just don’t expect me to be responsible if it’s not quite as decadent!
Super important tip: Make sure your cream cheese is at room temperature! I can’t stress this enough. Cold cream cheese = lumpy disaster. If you forgot to take it out early (we’ve all been there), just cube it up and microwave for 20-30 seconds on 30% power.
Eggs – Room Temp is Key
Same deal with your eggs – room temperature is your friend. Cold eggs will shock that cream cheese right back into lump city. Pro tip: if you’re in a rush, just plop them in some warm water for about 15 minutes.
Sweeteners – The Sweet Spot
This is where things get fun (and maybe a little confusing). Here are your best options:
- Confectioner’s Swerve is like the gold standard for desserts – no weird gritty texture
- Regular granulated Swerve works great too, especially in creamy stuff like this
- Erythritol is super popular (and those carbs don’t really count since they don’t mess with your blood sugar)
- Allulose is another solid choice, though it’s a bit less sweet
- Monk fruit erythritol blends are fantastic too
Just skip the liquid sweeteners like honey or maple syrup – they’ll mess with the texture. And remember, different brands have different sweetness levels, so always taste-test!
Flour for the Crust
Use almond flour, not almond meal – there’s a difference, and it matters! You can also get creative with walnut or almond-pecan crusts if you’re feeling adventurous. They’re way better than trying to recreate graham crackers anyway.
If you’re using coconut flour, be careful – that stuff’s like a sponge and will absorb everything in sight if you use too much.
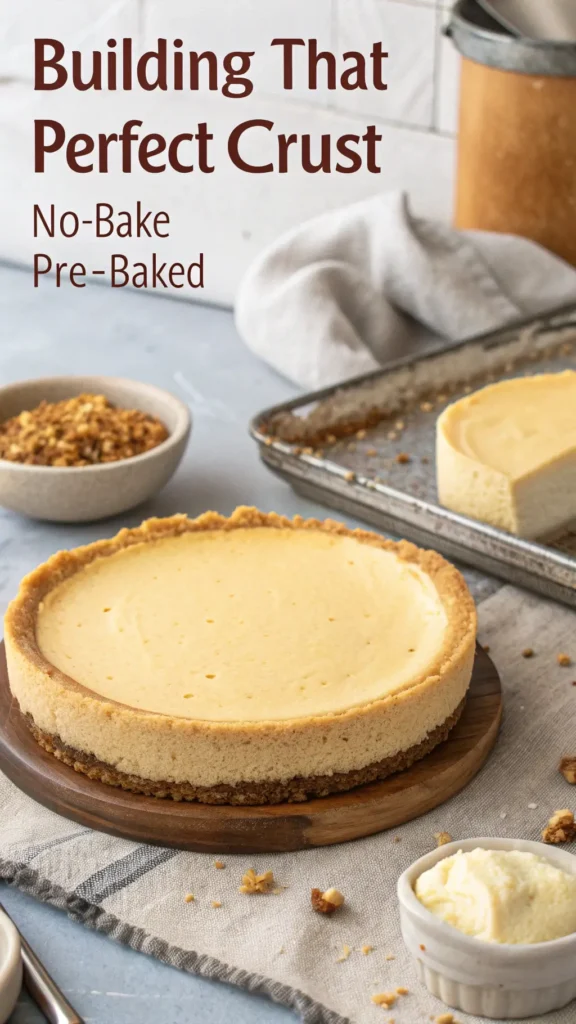
Building That Perfect Crust
A good cheesecake starts from the ground up, and that means nailing the crust.
You can go no-bake if you’re lazy (no judgment here!), but pre-baking for 5-15 minutes really makes the flavors pop and gives you that nice golden color. Just toss your nuts in a food processor until they look like coarse sand, mix in some melted butter, and press it into your pan.
Pro tip: Press it up the sides too – it looks way more professional that way.
If you’re pre-baking, cover the edges with foil so they don’t burn. Nobody wants bitter crust edges ruining their masterpiece.
The Filling – Where the Magic Happens
This is where you really can’t mess around. The secret to silky smooth filling is all in the technique.
Start with your cream cheese, sweetener, and vanilla. Get that perfectly smooth first. Then add your pumpkin, eggs, and spices. Some people like to add the cream and spices at the end – honestly, as long as everything’s smooth, you’re golden.
Use a food processor if you have one! It’s way better than a hand mixer for getting that restaurant-quality smoothness. And when you add the eggs, just pulse until they’re mixed in – don’t go crazy or you’ll get cracks later.
Baking Without the Drama
Most recipes call for 350°F, and you’ll bake until the center’s just set but still has a little jiggle. Time varies depending on your pan size – an 8-inch might need 40 minutes while a 9-inch could be done in 30.
Water bath = your new best friend. Seriously, it prevents cracks like nobody’s business. If you’re using a springform pan, wrap that sucker in foil so you don’t get water leaking in.
The cooling part is super important (and super boring, I know). Let it cool completely at room temperature, then chill it for at least 4 hours. Overnight is even better. This isn’t just being picky – it’s the difference between a good cheesecake and an amazing one.
Making It Look Instagram-Worthy
Keep the toppings simple but effective:
- Homemade keto whipped cream is always a hit
- A sprinkle of cinnamon or pumpkin pie spice
- Melted dark chocolate drizzled on top (add this right before serving though)
For perfect slices, dip your knife in hot water and wipe it clean between cuts. Your guests will think you went to culinary school or something.
Storage and Make-Ahead Tips
This baby keeps in the fridge for about a week in an airtight container. It also freezes really well – just wrap individual slices and toss them in a freezer bag.
Actually, here’s a secret: cheesecakes are perfect make-ahead desserts. They often taste even better the next day, and during the holidays, who has time to stress about last-minute desserts? Make it ahead and pat yourself on the back for being so organized.
Mix It Up – Creative Ideas
Don’t feel like you have to stick to the script! Here are some fun variations:
- Throw in some dark chocolate chips for a pumpkin-chocolate combo
- Try sweet potato instead of pumpkin for something different
- Add a splash of brandy to the pumpkin layer if you’re feeling fancy
- Make it dairy-free with coconut oil and almond milk cream cheese
You can make this in a regular pie pan, springform pan, 9×13 for bars, or even individual mini cheesecakes in muffin tins. Just adjust your baking time accordingly.
When Things Go Wrong (It Happens!)
Don’t panic if things aren’t perfect:
- Cracks in your cheesecake? A water bath helps prevent them, but if they happen, just cover with whipped cream or chocolate drizzle
- Crust getting too brown? Foil is your friend
- Lumpy filling? Next time, make sure that cream cheese is really at room temperature and use a food processor
- Pan overflow? Use a deeper pan or scale back the recipe a bit
The Bottom Line
Look, this isn’t just another dessert recipe – it’s your ticket to enjoying the holidays without completely derailing your health goals. And the best part? It’s actually delicious enough that your non-keto friends and family will be asking for the recipe.
So go ahead, give it a try! And when people ask how you made something so amazing that’s also keto-friendly, just smile mysteriously and tell them it’s all about knowing the right tricks.
Happy baking, and prepare to become everyone’s favorite person at holiday gatherings!